 Skip to content

Non-optimised images could be one of the main reasons why your website is slow for its visitors. In this article, we will guide you through the process of optimising images for better performance and SEO.
When we talk about optimisation, it usually means reducing the size of images without compromising on the quality.
According to HTTP Archive, as of April 2020, images add up to nearly 50% of a total website’s weight — for reference, today’s websites are averaging around 2MB total in weight.
By using images that are not optimised for web use, this weight can grow almost uncontrollably, even more so if the website in question is image-heavy.

Source: @neonbrand / Unsplash
Images we take with our smartphone cameras today range anywhere between 2MB and 5MB in size — in reality, there’s almost no upper size limit due to various camera settings and conditions the photo is taken in. While this is still substantially smaller than images taken with professional cameras, it’s still too large to consider them for web use.
So what’s the best approach for using images on the web, without negatively impacting image quality or page speed?
Using Plugins to Optimise Your Images
Apart from numerous services for resizing and optimising your images, there are also plugins you can utilize that’ll let you partially automate the image optimisation process.
Let’s take, for example, Smush, a WordPress plugin that makes great effort to optimise images for your website.
What’s important to understand is that solely relying on the plugins themselves is not enough. For example, you should never upload 2 MB images to your WordPress media library (unless you have a really good excuse for it), as this can result in unnecessarily eating up your web hosts’ disk space.
Combining the image size optimisation together with using an appropriate file name should become a routine when adding images to your website.
What Is the Best Way to Optimise Images?
The best method is to quickly resize the image in a photo editing tool or an online service beforehand, and then upload it and use tools to optimise the images further. It’s an added bonus if you utilize lazy-loading offscreen and hidden images to reduce the amount of kilobytes served on the initial page load.
What’s Going on Behind the Scenes When You Optimise Images?
It’s always good to get a sense of what actually happens with images during the optimisation process. Websites usually contain images in one or more of the following image formats: JPEG, PNG, GIF, or SVG.
- JPEG – uses lossy and lossless optimisation. You can adjust the quality level for a good balance of quality and file size.
- PNG – produces higher quality images, but also has a larger file size. Was created as a lossless image format, although it can also be lossy.
- GIF – only uses 256 colours. It’s the best choice for animated images. It only uses lossless compression.
- SVG – scales very well due to vector graphics support, commonly used for website icons.
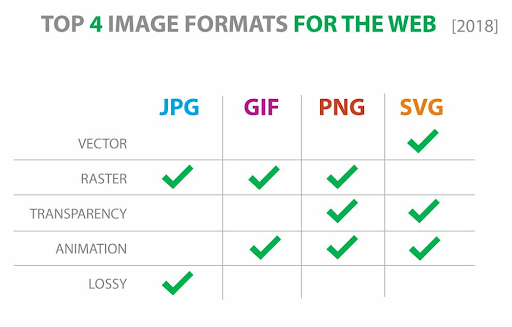
Source: PageCloud
What Is Meant by Lossy Compression?
Lossy compression refers to compression in which some of the data from the original file (JPEG) is lost, resulting in degraded image quality. The process is irreversible and once converted to lossy, it’s not possible to convert back to the original quality.
Advantages: Very small file sizes and lots of tools, plugins, and software support it.
Disadvantages: Quality degrades with higher ratio of compression. Can’t get original back after compressing.
What Is Meant by Lossless Compression?
Lossless compression reduces the image size without any loss in quality, which is usually done by removing unnecessary metadata from image files.
Advantages: No loss of quality, slight decreases in image file sizes.
Disadvantages: Larger files than if you were to use lossy compression.
Next-gen image compression
In the past years support for Google’s WEBP and WEBM file formats has grown considerably, although both formats are still not fully supported in Safari and IE browsers.
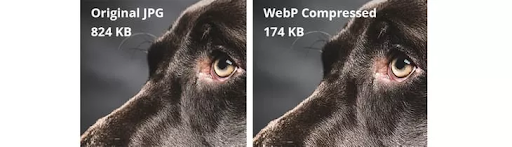
Source: KeyCDN
Advantages: No loss of quality, large decreases in file size.
Disadvantages: Less browser support , slightly larger file sizes than lossy.
Lossy VS Lossless Compression
There is no right or wrong choice when it comes to lossy vs lossless compression if you follow the above guidelines. It usually comes down to what works best for you and your website visitors. Eg., if you run a photography website, lossless along with the WebP format might be the best choice as you need your images to be high-resolution, crystal clear, and still be reduced in file size to provide good page speed.
On the other hand, if you use images mostly for decorative purposes, using a lossy approach with just the right balance between image quality and image compression is the way to go.
